c.jpg)


Suggested Messages
"Bag of bear hugs"
"You're unbearably cute!"
"Join the cub!"
"I can't bear being without you!"
Suggested Messages
"Write on, valentine!"
"You're all write."
"You're so sharp!" 
Suggested Messages
"We're two of a kind!"
"You've met your match!"
"You're two cute."
Showing posts with label Our projects-ideas-thoughts. Show all posts
Showing posts with label Our projects-ideas-thoughts. Show all posts
1.29.2009
Classroom Valentines...

1.21.2009
Paper and Paste
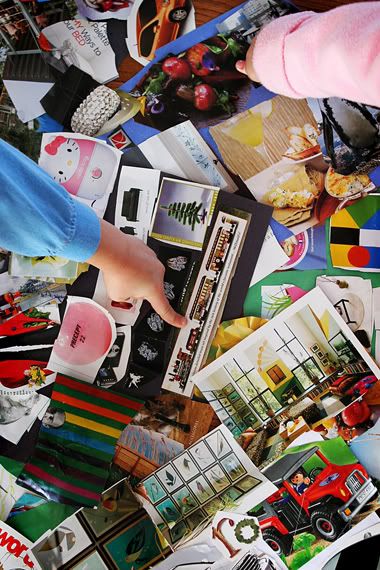
I tend to skip over or forget the simple activities I can do with my kids. It is easy to get caught in the trap of thinking that any project needs to be really educational or have some fantastic finished project, and forget that the some of the most basic activities keep us busy and happy the longest with the least amount of effort.
Today I wanted to flip through a pile of magazines before I recycled them and the kiddos needed something to do. We pulled out construction paper, scissors, glue sticks and glue bottles. After showing the kids they could cut items out and glue them on the paper we all got to work. I read my magazines, scissors in hand, quickly cutting out any items I thought the kids would like, and they enjoyed choosing their favorites and gluing them in all sorts of random ways. An hour or so later I had finished my reading and the kids had finished their "project." I hope someone else finds this as perfect for a cold winter day as I did!
Today I wanted to flip through a pile of magazines before I recycled them and the kiddos needed something to do. We pulled out construction paper, scissors, glue sticks and glue bottles. After showing the kids they could cut items out and glue them on the paper we all got to work. I read my magazines, scissors in hand, quickly cutting out any items I thought the kids would like, and they enjoyed choosing their favorites and gluing them in all sorts of random ways. An hour or so later I had finished my reading and the kids had finished their "project." I hope someone else finds this as perfect for a cold winter day as I did!
12.07.2008
A Month of Christmas Books
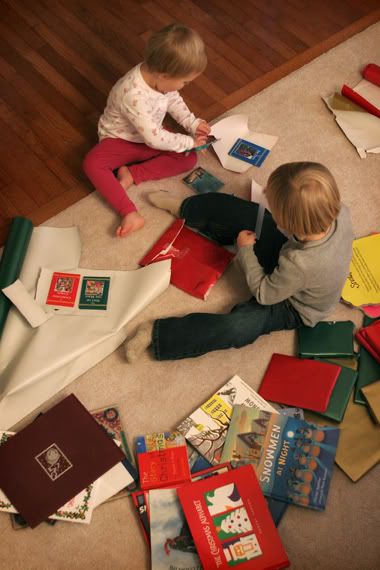
A favorite December tradition that I have taken from my childhood is wrapping holiday books to be opened and read each night before Christmas. Not knowing what book you will be reading each night makes for a fun surprise and unwrapping the packages is always a pleasure! Our book collection has grown so we open a couple books every night of the month, but this can be set up as a 12 Days of Christmas/Hanukkah tradition too. We keep the wrapping simple and let the kids help (yes, my 2-year old has the scissors!). They have fun with it and everyone has a good time getting a sneak peek at the books we will be enjoying.
My reasoning behind wrapping lots of books and keeping the wrapping simple is this: The day after our wrapping party my daughter opened maybe a third of the books we had wrapped in a matter of five minutes of alone time. Fortunately that is what they are there for and it left us with lots of books to read outside of the special books to be unwrapped nightly. This is just a warning in case you put a lot of effort into wrapping beautiful packages!
I have a few books I want to add to our collection this year and am always open to other's favorite titles. Do you have any children's holiday book recommendations? If people are interested I am happy to take the time to list and link to the books we enjoy, but only if people express interest!
11.20.2008
Indoor Activity...
 A good friend tipped me to this great Play Dough recipe that is not too salty, didn't dry out our hands, or dry out in a few days. It's perfect for playing inside while the cold weather passes and to keep your kiddos from boredom or too much tv.
 homemade play dough
Ingredients:
3 c. flour
3 c. boiling water
1 1/2 c. salt
6 tsp cream of tartar
3 TBS oil
food coloring
Directions:
1. In a large bowl, mix together flour, salt, cream of tartar and oil.
2. Add boiling water and mix well. You can knead dough on floured surface until no longer sticky (do not add too much flour or dough will dry out).
3. store in air tight container or ziploc bags.
10.30.2008
Chalkboard Pumpkins...

Another fun idea for your kids pumpkins.
-Use chalkboard paint and paint the entire pumpkin.
-Give your kids chalk and let them go crazy.
The best part, you can wash off the pumpkin and reapply chalk everyday!
thanks for the great idea amy!
10.23.2008
DIY Happy Halloween Sign...

Supplies:
Black scalloped note cards from Michael's or if you live near a Paper Source their round ones are even better.
Halloween-ish paper (I just used what I already had lying around)
Sparkly pipe cleaner
Letters reading "Happy Halloween" (paper, or vinyl or printed at home will all work great)
Pom pom trim if you want to get really fancy
Hot glue
Glue stick
Hole puncher
Ribbon
1. Cute decorative paper down to size and glue to scalloped card
2. Using hot glue gun attach pom pom trim to the back bottom edge of scalloped card.
3. Glue pipe cleaner or other glitter trim to outline decorative paper using glue gun
4. Apply letters to each one, punch a hole in top corners, string onto a ribbon of your choice and hang.
Why not make one for every occasion/holiday?
as seen on my friends sara b's blog. thanks!
10.20.2008
Mini "Caramel" Apples


We made mini "caramel" apples last week and they were a fun and easy snack. To keep things simple and quick we spread peanut butter on the apple instead of caramel, and dipped the apples in crushed nuts and toffee and chocolate bits. Using peanut butter and nuts made me feel this stayed more in the category of "snack" rather than "treat."
 Here's what we did:
Use an ice cream scoop to scoop mini-apples out of a regular apple. These don't turn out as round as you might think, but they still work. You could also use thick slices and call them moons. Stick a toothpick in the skin side of the mini-apple.
Spread on "caramel" of choice. Use the real stuff, or for a quick fix try peanut butter, nutella, sweetened cream cheese, etc. The apple is not going to look pretty at this point; the toppings are what round it out and make it look nice.
Hand apples to the kiddos and let them dip into the toppings of your choice. We used pecans, toffee and chocolate bits, but you could use just about anything: flaked coconut, sprinkles, mini m&m's, crushed granola, or maybe even sesame seeds or ground flax seeds. The dipping itself is so fun you could probably sneak all sorts of healthy stuff in there if you are so inclined.
Enjoy, and then make another one. My kids really got into choosing different topping combos for each apple. It was cute.
8.26.2008
Save $$ on Back-to-School Supplies

As a kid, I always wanted brand new stuff every single school year. Now that I'm an adult, I can see the strain that must have put on my parents. Here are a few tips for saving money on your kiddos' school supplies:
Take advantage of tax-free days. Click here to see if any exist in your state.
Shop secondhand. If your children are obsessed with having stuff that's "new," well, leave the little ones at home. They'll (hopefully) never notice the difference.
Befriend your local dollar store. The stuff's new and it's cheap, too.
Don't overspend on technology. Computers are becoming a necessity for most older students -- just make sure you don't buy one that is too powerful. Likewise, don't underspend on a computer that does not meet the needs of your child. A new MacBook for a third-grader is overkill, but a college-bound young adult with an eye on a graphics-art degree might need the horsepower.
For more ideas, click here to read the full article.via msn smart spending blog. image via here.
8.07.2008
Color Fun...
For learning colors, counting, and just for fun, This one of a kind idea is one you'll want to share with everyone! And you're kids will want to play over and over and over again!

1. food coloring
2. dried pasta (any kind)
3. rubbing alcohol
4. ziploc bags
Directions:
1. place noodles in ziploc bag. double bag or place in a tupperware bowl in case of leaks.
2. completely cover the noodles with rubbing alcohol
3. mix in food coloring
4. let the noodles sit to absorb color
(the longer they sit, the deeper the color. I left mine over night)  5. once desired color is reached, drain liquid (do not rinse) and dry noodles on cookie sheets
enjoy! let your child's imagination flow.

the muffin tin helps sort the noodles by color and shape.
it has also helps learn to count.
 for older kids, you could use the noodles to make necklaces and other art projects
imagination and creativity (and photos) of this project is credited to brit p., thanks for all your amazing ideas!
7.24.2008
Homemade BOWLING.
Another genius idea from a friend who gave me this idea: Homemade Bowling... what you need and how to:
Cups: $1.25
Tape plastic cups together to create 10-pin bowling.
Ball of choice - preferably a soft ball: $1 - $3
Tape plastic cups together to create 10-pin bowling.
Ball of choice - preferably a soft ball: $1 - $3
thanks brit p.
7.10.2008
Another Variation to the Diaper Cake...


Easy and just as cute here's how to make this fun gift...
Materials Needed:
5 or 6 Receiving Blankets
5 or 6 Burp Cloths or Cloth Diapers
5 0r 6 Wash Cloths
Doll or Some kind of topper
rubber bands
ribbon of your choice
sewing pins
DIY:
1. Fold receiving blankets to desired size and roll 3 individually.
2. Couple the individually rolled and put a rubber band around them and use as an inside base.
3. Roll the other blankets over the 3 individually wrapped. Put a rubber band over it for security.
4. Repeat these same steps for the burp cloths and use the washcloths for the inside base. Use the remainder of washcloths to decorate the out side of the cake. --Be creative.
5. Put a thin rubber band over the top and to the bottom of the "cake" for extra security.
6. Pin the topper on with sewing pins.
7. Tie ribbon around each layer so the rubber bands don't show.
8. Put some accessories along the ribbon if you desire, i put some bows around it.
9. Wrap with cellophane.
Your Done!

6.26.2008
DIY Sandbox.
A genius and very creative friend turned me on to this creation... No itty bitty sand grains, no sand in clothes, shoes or hair, no sand mess! But just as fun!!!

DIY - what to buy:
1. large tupperware box
2. 10 bags of dried split peas
3. shovels, buckets, water bottles, etc.
Added bonus: Quick and easy clean-up... put the lid on the box and store it for next time!
thanks brit p!
1. large tupperware box
2. 10 bags of dried split peas
3. shovels, buckets, water bottles, etc.
Added bonus: Quick and easy clean-up... put the lid on the box and store it for next time!
thanks brit p!
5.29.2008
Color Me Mine!
 Any day of the year COLOR ME MINE is a great place to go... Father's Day is just around the corner and there is nothing better to give your dad than a hand painted craft! I love going there and picking out a piece of ceramic and making it my very own!
Here's how it works:
Step 1: Choose your ceramic piece... there are over 1000 to choose from!
Step 2: Sketch your original design with a pencil. Or choose graphics from the design computer (they have over 25,000 ideas!).
Step 3: Select your underglazes (paints). There are 65 different colors!
Step 4: Paint it however you like!
Step 5: Fire in our kilns on premises. (the staff will do this for you!)
Step 6: Take it home and enjoy!
To find a STUDIO near you, CLICK HERE!
5.15.2008
Schools Out...
Are you wondering what to give the teachers? I LOVE this pencil flower pot... homemade and beautiful! Your kids will have a fun time making it and their teachers will have a fun time using it!
| CRAFT MATERIALS: | |
| Pencil | |
| Hair scrunchies (or fake flowers) | |
| Craft foam leaves | |
| Craft scissors | |
| Hole punch | |
| Clay pot | |
| Black beans | |
Time needed: Under 1 Hour | |
1. For each blossom, wrap 1 or 2 colorful hair scrunchies (or fake flowers) around the top of a pencil. Next, cut out a pair of green craft foam leaves, using craft scissors to create a scalloped edge. Lightly etch leaf vein lines in the foam with the tip of a toothpick. Using a hole punch, make a hole in the base of each leaf.
 2. Then slide the leaves onto the pencil so they rest right beneath the flower. You can even attach a "silk" butterfly (sold at craft stores) to the blossom.
3. Finally, plant the finished flowers in a clay pot filled with dried black beans (if beans fall through the hole in the bottom of the pot, just tape over it).
{via familyfun.com}
5.12.2008
Fingerpaint Wall Art
 My friend was looking for a creative and personal way to decorate her son's "big boy" room, and I really enjoy what she came up with. First, her son went crazy and finger painted the canvases in Mom's chosen colors, then they personalized his art with hand and foot prints, attractively capturing and displaying his growth.
 Work in progress!
Pick up your choice of canvas and acrylic paint at any local craft or art store and get painting! I am thinking of all the fun possibilities with a larger canvas and multiple feet and hands. . .
Thanks Brittany!
5.01.2008
Comforting Sounds...
I remember being a brand new mother... Feeling the overwhelming love for this tiny bundle of joy. Wanting to do everything and anything i could to always make my baby happy... After a few sleepless nights of feeling unaccomplished and not knowing what to do to stop a crying baby, I found comfort in music... and so did my baby... I was relieved!
Here are some tunes from my play list to comfort and help sleep... It might not work all the time, but it sure helped me out!
"Fireflies" - Faith Hill
"I'll Stand By You" - Carrie Underwood
"Come Away With Me" - Norah Jones
"Daughters" - John Mayer
"Yellow" - Coldplay
"What a Wonderful World" - Louis Armstrong
"Godspeed" - Dixie Chicks
"Twinkle Twinkle Little Star" - Elizabeth Mitchell & Lisa Loeb
"I Am Like A Star" - Amy Gileandi
"Beautiful Savior" - Becky Williams
These are just a few of my favorites... you can download them {and more} on iTunes. What are your favorites? Please leave a comment and share them with us! Thanks!
4.17.2008
DIY...

- Find a chair, any chair with wooden surfaces, you'd like to revamp.
- Use scrapbook paper, images, pictures, patterned paper, or anything else you desire... cut into squares, rectangles, triangles, stars (again, anything you desire.)
- Using a foam brush (available at any craft store), apply a craft glue (Mod Podge) to the back of the paper.
- Place the paper on to the chair and apply a layer of glue on top.
- Repeat with the rest of the papers and allow to dry completely before sitting on the chair.


You can even decoupage kids tables, coffee tables, or anything you like... E-mail us your decoupage photos at tutusandturtles5{at}gmail{dot}com.
{as seen on AT}
Cupcake CAKE...

I am a huge lover of cupcakes... so when my mother-in-law bought me this cake pan, i was jumping for joy! A giant cupcake!!! Use it for birthdays, neighbors, friends, or even yourself! With easy instructions on how to put the two pieces together and extended cook times, you look like a pro, this is a no brainier... even the non-baker can do this! It is without doubt that this is my new favorite cake pan!

4.10.2008
homemade chalk...

From many fun outdoor activities as i was young, i remember sidewalk chalk very vividly... hop scotch, tic tac toe, i
1. Make a mold by covering one end of the tissue tube with duct tape. Loosely roll up a piece of waxed paper and slip it into the tube. This lining will keep the plaster from sticking to the mold.
2. Measure 3/4 cup of warm water into a disposable plastic container. Sprinkle in plaster a little at a time, until the powder no longer dissolves (about twice as much plaster as water). Stir slowly and thoroughly with a spoon. Then, mix in 2 or 3 tablespoons of tempera paint. For pastel shades, combine white tempera with a primary hue. Rinse the spoon under an outdoor faucet or in a jar filled with water to avoid clogging sink drains.
3. Place the mold sealed-end down on a level surface and pour in the wet plaster. Lightly tap the sides of the tube to release air bubbles in the plaster. Let the chalk harden for a couple of days. Then, remove the tape and slide the marking stick out of the mold.
4.07.2008
Apple-Cheese Boats
 Apple-Cheese Boats are our new favorite snack. Thick slices of apple, cheese and toothpicks are all you need for a very fun and very healthy snack. You can spend quite a bit of time making all sorts and sizes of boats to replace the ones that get shipwrecked or eaten by sharks and octopuses. Multiple toothpicks and different sizes of cheese sails make for some pretty intense pirate ships!
Subscribe to:
Posts (Atom)


